Azure AD authentication and authorisation in Angular applications
There is plenty of documentation on integrating javascript applications with Microsoft cloud authentication, however there is little information on how to define which users are allowed to log-in, managing them and assigning the roles your application uses to them using Azure AD. Read on to learn how to do an end-to-end integration of Angular, Azure AD and user+role management.
I recently had the need to add cloud-based Microsoft authentication to an angular+rails application which uses role-based access control, including integrating authorization of users who are assigned roles directly in AzureAD. This removes the need for the application from having to manage users locally (urgh) and separates the management of the application from the management of its users (yey!).
Users choose to log-in using their Microsoft AzureAD credentials (aka their Office365 account) by clicking on a link on the application login page. They are then redirected to the Microsoft login page and, once authenticated, a JWT token is sent back to the application which includes the users roles. The application extracts these roles and uses them to authorise the user access.
To achieve this we will implement the following steps:
- Register your application with Azure
- Assign application roles to users or groups
- Integrate AzureAD authentication with your application
- Access AzureAD JWT token and extract roles
While there are plenty of articles and libraries that integrate angular and azure authentication, I did not find much information on using azure for user application role management, I hope you find this article and the accompanying code useful.
Register your application with Azure
Azure needs to learn about your application in advance (amongst other things to decide which user repository to authenticate against and where to send authentication results to).
To register the application you need to access the Azure Active Directory admin centre, either get permissions or find a friendly Azure admin in your organisation who can help you with making the required changes. The Microsoft admin centres are a bit like shifting sand, so the names of the options below may have changed since this article was published - if you can’t find the specific option mentioned try to find for something that sounds similar…
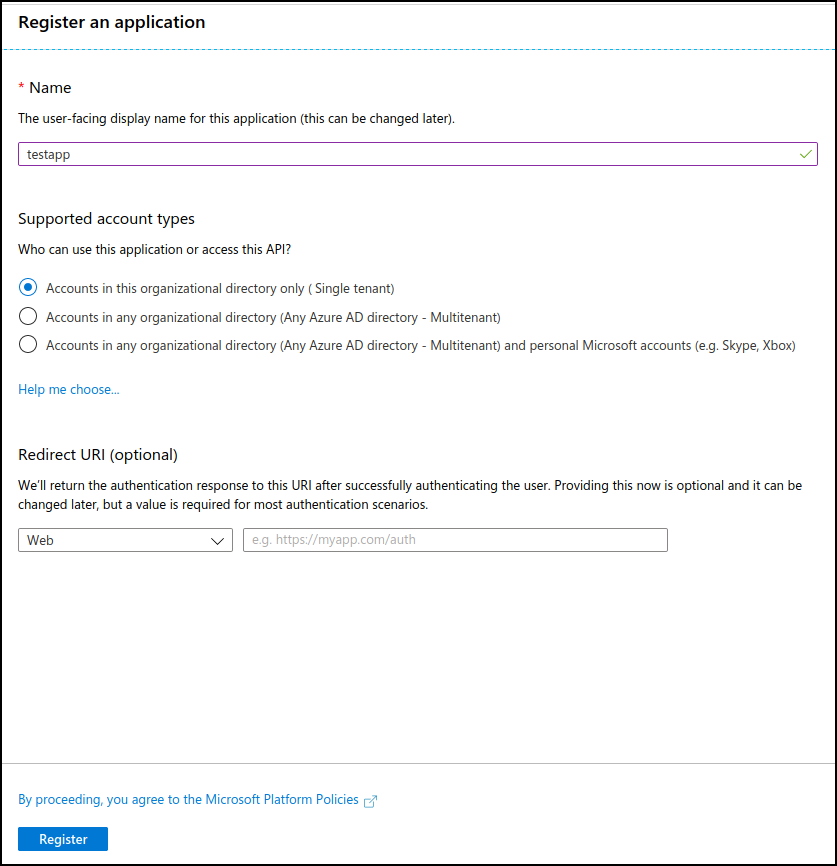
After you login to the Azure Active Directory admin centre click on “Azure Active Directory” on the left menu, then select “App Registrations” from the Manage section and register the application you want to integrate with Azure AD.
The information required during registration is quite straight-forward, but here is a brief description to help you fill in the details:
- Name: a descriptive name that will be used to refer to your application, we will use “testapp” throughout the article
- Supported account types: select the scope of user accounts that you want authenticating against your application, either restricted to your own Office365 tenant, to other Office365 tenants or including personal accounts. For our application we will go with “Single tenant”
- Redirect URI: enter the URL that your users will be clicking on the ‘Login with Microsoft’ button
After submitting the registration form, we will be provided with two of the key values we need to configure Azure authentication in our application, the “Client ID” (which identified our application to Azure) and the “Tenant ID” (a common ID which tells Azure which organisation to authenticate against). Write down these values as we will need to use them later on.
For our application we will be using the OAuth 2.0 Implicit Grant flow, as we need to access the ID tokens directly. After registering the application, we will click on ‘testapp’ and then select ‘Authentication’ from the left-side menu, scroll down to ‘Implicit grant’, tick the ‘ID tokens’ checkbox and then save so that the application is updated.
Define application roles
Once we have the application registered with Azure, we need to let Azure know the various roles your application supports. There is no nice and easy GUI to add the roles, instead we will edit the application manifest directly, e.g. the JSON file Azure uses to understand and register your application.
On the application menu, select “Manifest” which will open the application definition and find this section:
"appRoles": [],
For each role we need to provide the following information:
allowedMemberTypes: list of allowed member types, it should include a singleUserentrydisplayName: The friendly name we will use when assigning roles to usersdescription: A brief description of what the role allows the user to doisEnabled: Set it to true to enable the rolevalue: The value your application will receive inside the JWT token, when the logged in user has this role assigned, this is the important oneid: A unique GUID, generate something random which meets this format (hexadecimal characters): “xxxxxxxx-xxxx-xxxx-xxxx-xxxxxxxxxxxx”
Microsoft provides some documentation around the definition of application roles you may find helpful.
In our case let’s assume we have an ‘admin’ role which allows users to manage the application, our appRole would be filled-in with this information:
{
  "allowedMemberTypes": [
    "User"
  ],
  "displayName": "Admin",
  "description": "Can manage application settings",
  "id": "84ecd32a-8829-a8d8-cb4d-93dcfe8f7dab",
  "isEnabled": true,
  "value": "admin"
}
Just add as many roles as you require to the JSON file as a list of items assigned to appRoles, your file should look similar to this:
"appRoles": [
{
  "allowedMemberTypes": [
    "User"
  ],
  "displayName": "Admin",
  "description": "Can manage application settings",
  "id": "84ecd32a-8829-a8d8-cb4d-93dcfe8f7dab",
  "isEnabled": true,
  "value": "admin"
},
{
"allowedMemberTypes": [
    "User"
  ],
  "displayName": "Editor",
  "description": "Can edit content",
  "id": "84ecd32a-8829-adda-cb4d-93dcfe8f7dac",
  "isEnabled": true,
  "value": "editor"
},
{
  "allowedMemberTypes": [
    "User"
  ],
  "displayName": "Reader",
  "description": "Can read content",
  "id": "84ecd32a-8829-9abd-cb4d-93dcfe8f7dad",
  "isEnabled": true,
  "value": "reader"
}]
Once you are happy with the changes save the manifest, after verifying the syntax Azure will make the roles available for user management.
Assign application roles to users or groups
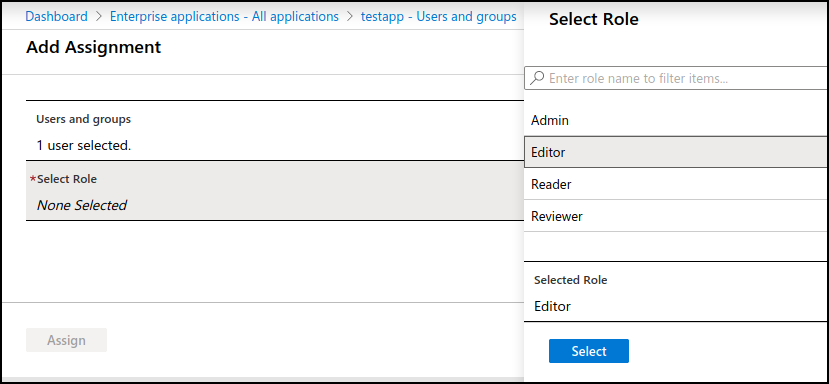
To assign the roles to Azure users you will continue in the Azure AD admin centre, select “Enterprise applications” on the left pane and then click on the name of the application you created (in our case “testapp”). Then select “Users and groups” to start assigning roles.
Click on “Add user” and select the user (or group) you want to assign a role to when accessing your application, then under “Select role” pick one of the role friendly names we created in the previous section, and repeat for as many roles, users and groups as needed.
Integrate AzureAD authentication with your application
Microsoft provides MSAL, a javascript library to authenticate against AzureAD which has an angular version.
My initial approach was to try and use the Angular wrapper (available in NPM as @azure/msal-angular), as it makes for an easier integration - however the wrapper hides the idToken property of the javascript MSAL object which is required to extract user roles which made me integrate against the MSAL.js library directly. The angular wrapper is still in preview as of this writing, but in the future it may be an option to consider.
The MSAL workflow is quite simple:
- Our login component will initialise the MSAL library by passing the azure client and tenant IDs
- When the user clicks on the “Login with Microsoft” button we will use the MSAL object to open a pop-up which will take the user to Microsoft to authenticate
- On successful authentication, Azure will redirect the user back to our application where we will use the MSAL object to read the user roles and authorise the access
Install and initialise MSAL
Start by installing the MSAL js library:
$ npm install @azure/msal
In the initialisation of our login component we will obtain a UserAgentApplication instance:
  var msalConfig: Configuration = {
    auth: {
      clientId: 'abcdef-0123-456789ab-cdef-012345' // AAD Client ID
    },

    system: {
      logger: this.azureLogger // This easies MSAL debugging, check the [accompanying code](https://github.com/llmora/azuread-angular-example) for details on this property
    }
  };

  if (aad_tenant_id) { // To support single-tenant applications, not needed if supporting multi-tenant
    msalConfig['auth']['authority'] = `https://login.microsoftonline.com/${aad_tenant_id}`
  }

  this.azureADmsalInstance = new UserAgentApplication(msalConfig)
Authenticate the user against Azure
When the user decides to authenticate through Azure we have two integration options:
- A pop-up that, after authentication, closes down and sends the results of authentication to our client-side application
- A redirect to Microsoft which, after authentication, redirects back to one of the URIs we have configured when registering the application
After some testing I opted for the pop-up integration due to it being easier to integrate (it requires less configuration, e.g. no redirect page to receive the response) and the impossibility to include a hash in the return URI of an AzureAD application, which makes it impossible to use it with angular if you are using a HashLocationStrategy (e.g. the angular paths separated with hashes, for instance /#/login). If you want to use redirect either ensure you are using PathLocationStrategy or use a static HTML served outside of your angular application, as described in this GitHub issue and configure that path in the ‘Redirect URI’ of your application registration.
Going with the pop-up option is quite simple, just bind this code to the action which executes when the user selects to authenticate through Microsoft:
var loginRequest = {
  scopes: ['user.read']
};

this.azureADmsalInstance.loginPopup(loginRequest)
  .then(response => {

    [... successfully authenticated ...]

  })

  .catch(err => {

    [... error authenticating ...]

  });
Troubleshooting MSAL
While developing with MSAL it can be a bit daunting to troubleshoot, these are some of the issues I have faced during implementation:
- Make sure your client and tenant IDs are correct
- If you are configuring the application for single-tenant you need to include the tenant ID in the authority URL
- If you are using the redirect option, during development you will probably be using “localhost” as your landing page. Note that localhost and 127.0.0.1 are not the same as far as return pages are concerned (your application will work, but you will not receive the token back from Azure)
- If you are getting an AADSTS700054 error (“response_type ‘id_token’ is not enabled for the application”) make sure you have selected the ‘ID token’ implicit grant, as described in the last step of Register your application with Azure
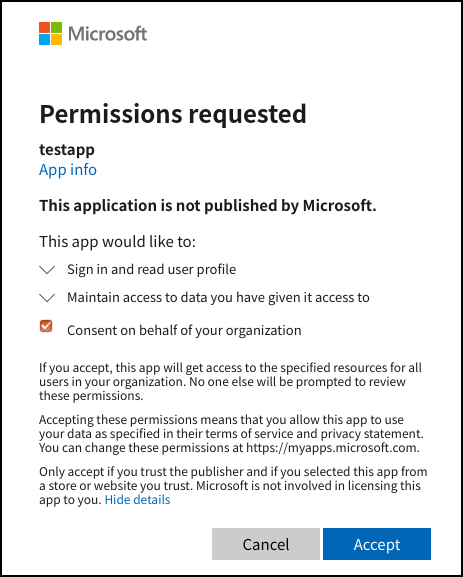
- The first time you login to the application, an admin must consent for it to be authenticating against your AzureAD instance. Make sure an admin is the first one to login, and that they check the ‘Consent on behalf of your organisation’ when prompted:
MSAL offers a logger that is quite verbose about the errors it encounters, if you are facing issues I strongly recommend you use the logger - see the UserAgentApplication instance initialisation in the accompanying code for more details.
Access AzureAD JWT token and extract roles
After a successful login we will receive a JWT token which encodes the details of the authenticated user as well as the roles she has assigned. Use the getAccount() method of the MSAL object to retrieve the authenticated user e-mail:
var azureAccount = this.azureADmsalInstance.getAccount();
Retrieving the JWT token is even easier, as MSAL sets a ‘idToken’ in the response - this is the key to accessing roles as these are not exposed by MSAL directly:
var idToken = response.idToken
If for whatever reason you need to use an older version of MSAL, please note that the idToken was not exposed in the response but could be extracted from the sessionStorage:
var idToken = window.sessionStorage.getItem(Constants.idTokenKey)
idToken is the raw JWT token which we will use to extract the roles from, after validating it is correctly signed by the Microsoft login service to avoid login spoofing attacks. The validation of this token needs to happen on the server side, at a high-level these are the steps we need to follow:
- Verify the signature, issuer, expiration and audience of the JWT token
-
Extract the claims, which give us access to the following information:
oid: Unique ID for the user across the Microsoft platform preferred_username: User e-mail roles: List of application roles the user has assigned
The roles entry is a list of role strings (the value we gave to the relevant appRoles in the manifest) which you can then use directly in the application to authorise the user actions.
Below is a ruby implementation which extracts the user e-mail and roles from the JWT token using the AzureActiveDirectory class (which does most of the heavy-lifting):
aad = AzureActiveDirectory.new(client_id, tenant_id)

# Verify signature, issuer and audience
azure_claims, azure_header = aad.validate_and_parse_id_token(id_token)

if azure_claims
  user = User.new
  user.external_identifier = azure_claims['oid']
  user.email = azure_claims['preferred_username']

  azure_claims['roles'].each do |role|
    user.add_role(role)
  end
end
Once you have the roles you know which permissions the user has and can authorise his next actions as appropriate, as if he was a local user. Because the JWT token is only passed on in the pop-up or redirect you need to assign the roles to the user session, which will depend on how you are managing your application sessions: a local JWT, an entry in the login session, etc.
Conclusion
Integrating Azure AD authentication and authorisation against an angular application is quite simple if you are familiar with how these steps work:
- Creating appRoles for your application in Azure
- Assigning roles to users in Azure
- Extracting the application roles from the Azure JWT idToken
In this article and the accompanying code we have shown how to implement this integration, it should be fairly easy to adapt the approach to other web frameworks besides angular as we decided to integrate the Microsoft MSAL js library directly instead of the angular wrapper.
If you have comments, questions or improvements to the article please reach out on Twitter or submit a pull request in GitHub.


