Installing a new Industrias Lorenzo Eurojoystick 2
After replacing the actuator on our Happ Super joystick gameplay has been much better, however the microswitches are showing their age so I ordered a pair of Industrias Lorenzo Eurojoystick 2 for 18 EUR a piece.

These joysticks come with a trademark square actuator, which makes hitting diagonals much easier and high-quality Cherry D44X microswitches.
Replacing the joystick in an arcade cabinet is not really a major operation, however I could not find step-by-step instructions anywhere so I am documenting it here in case someone else benefits from it.
Removing the old joystick
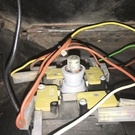
Before you start take a picture of the cabling of the current joystick, making sure you can clearly identify the up/down/right/left connectors - this will ease up the reconnection of the cables once the new joystick is installed.

Make sure you capture how each cable is attached - for each microswitch there will be a “ground” cable which is typically daisy-chained across the four microswitches and a “signal” cable. Each microswitch may have 2 or 3 connectors, note which one is the “ground” (COM) and which one is the “signal”: for the “signal” you will typically have two options, make sure you connect it to the “Normally Open” (NO) connector, which is usually pictured as an open circuit.
While the joystick is still secured to the control panel we will remove the shaft. Use a small flat screwdriver and needle-nose pliers to ease the shaft “e-clip”, make sure you do not lose this piece.

After the “e-clip” is removed, pull the actuator away (in the pictures the tight actuator we built, not the original one) and then pull the shaft which should slide out without any problem.
Once you are satisfied the picture is good enough, unplug the eight connectors that go to the microswitches.
After that remove the four screws holding the joystick base attached to the control panel, which frees up the base.

Put together the old joystick (base, shaft, actuator and “e-clip”) so that you can put it away and use for future projects after some TLC (we will likely replace the aging microswitches before usign them again).

Installing the new joystick
Now that we have the old joysticks out of the way it may be a good opportunity to clean the control panel, after all you only change the joysticks once every generation.
Ensure that the new joystick mounting holes align with those of the old joystick we removed; in our case the Happ Super and the IL Eurojoystick 2 have exactly the same mounting holes (I guess there is a standard size for joystick mounts).
Remove the “e-clip” and actuator from the new joystick; the shaft should slide out easily after that.

Fit the base on the arcade control panel, using the same screws you removed with the old joystick.

Reinstall the shaft and actuator, and secure both pieces with the “e-clip”.
As a last step, and using the picture you took at the beginning of the process, re-connect the eight cables to the microswitches, ensuring that the “signal” cable is connected to the “Normally Open” (NO) connector. Before you close the cabinet I recommend you test the joystick is working as expected.

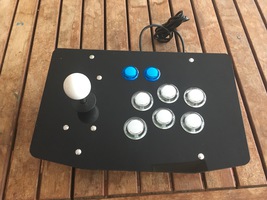
Close the cabinet and enjoy your new joysticks, they should last for another twenty years. The IL Eurojoystick2 feel really tight, tighter than our “modified” Happ Super and really responsive. I mostly use it for shot’em ups so I am really happy with the change, if you like other type of games your mileage may vary.